Friday, December 30, 2011

New Year's Glitter Fest


Sally Hansen Celeb City, Milani Silver, China Glaze Blue Year's Eve

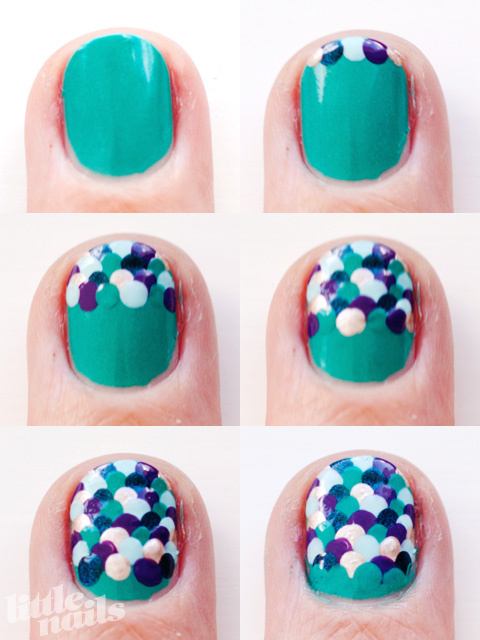
These are my New Year's Eve nails. Of course I had to use China Glaze Blue Year's Eve, none of my other nail polishes are have New Year's specific names so I figured it was a definite. I've always loved glitter accent nails and have recently seen a few reverse sort of accent nails, where the crazy glitter bombs are on all the nails and the accent nail is just a plain colour. So I blinged out all my nails and did a little gradient type thing over Blue Year's Eve. I was trying to go for a glittery gradient like getnail-d's accent nail on her mermaid nails mani but I kind of went a little bit overboard. 

In other news... I'm moving from my little home town in the country to the big bad city! On New Year's day I'm heading off to live in Sydney, which is why I've done my New Year's nails a day early. I'll be too busy packing tomorrow. Of course I'm taking all my polishes, and getting them through the six hour drive meant packing them securely. I had a cardboard box from work and some packing bubbles so I made a little double storey nail polish box to transport them. This photo shows about two thirds of my current collection, all snug in their little box. 


Thursday, December 29, 2011

Go Go Teenage Dream


China Glaze Go Go Pink, OPI Teenage Dream

After the craziness of all my Christmas nails I thought I needed a nice simple sort of manicure. I've been looking for the perfect light pink to suit my skin tone. So many pinks look weird on me, but I quite liked this. It was actually a lot pinker in real life, the sun scared it away a bit. And because I haven't had a plain ol' mani in what feels like forever I had to add a glitter accent nail. 

Wednesday, December 28, 2011

Mermaid Nail Tutorial


China Glaze Custom Kicks, China Glaze Grape Pop, China Glaze Rodeo Diva, Essence You Belong To Me, Face Of Australia White Gold

A few people have been asking how I did the scaley nail on my Sparkly Mermaid Nails mani, so here's a tutorial for it. It's really very simple, all you need to be able to do is to make dots. 

First I start with a base coat, usually using one of the colours I'll be using for the dots. Then, starting from the tip of my nail I make a row of dots using different colours. Sometimes I put a blob of each nail polish on my desk and dip my dotter in there, other times if I don't want to waste any polish I'll just poke the brush of the polish with my dotter. After each dot I wipe the dotter on a cotton ball soaked with nail polish remover so the colours don't get all mixed up. 

The reason I use so many different colours is that it looks better if there aren't any dots of the same colour next to each other, and having lots of colours makes it easy to keep them all separated. 

After the first row, I just keep dotting different coloured dots down the nail, overlapping them like the scales of a fish. 

At the end I use the same colour as the base coat to sort of form a start off point for the scales. In my original mani I started from the bottom, instead of the top, so it was backwards to this, but you can do it either way. And finally, finish it all off with a nice top coat!

This one is a little bit messier looking because I used smaller dots but it's the same process. So, if you can use a dotting tool and have a bit of time then you can do this mani! I hope this made sense. If you're unclear about anything just comment and I'll try to explain it in a better way.

***** a little extra *****

Since I popped this online I've seen a couple of other nail bloggers' designs using this tutorial and they just look so amazing that I wanted to share them here, so you can all see how awesome they look and the great colour schemes and whatnot so check out getnail-d and Delaynee's versions! Now I want to do this mani in a million different colour schemes! Thanks ladies!


Tuesday, December 27, 2011

Black Glitter Franken


Black Glitter Franken

After googling Butter London Black Knight about a million times I decided to try and franken up something similar. I had a bit of clear and black polish left over from when I created my My Private Jet concoction so I thought I'd add a bit of Ulta3 Confetti to it and see how it went. Confetti is mainly purple and green glitter, with a bit of blue and gold glitter in a clear base. Then I thought, why not add more glitter? I can't exactly remember what I added, but I think there's a bit of OPI Simmer and Shimmer, OPI Glow Up Already, Extra-Va-Vaganza and Sally Hansen Celeb City in there. Perhaps even some Amour Rain Glitter too! 

From far away it just looks like an odd black nail polish, but up close you can see all the different glitter.


So much glitter!!!

Monday, December 26, 2011

Pointy Glitter Tape Manicure


China Glaze Grape Pop, China Glaze Recycle, China Glaze Heli-Yum, Milani Gold

I've been wanting to do a pointy tape manicure for a while now. I'd been waiting to find colours that go together nicely, and were opaque in one coat. In my Christmas haul of nail polish I got a heap of China Glazes, including Grape Pop and Heli-Yum. I was super impressed with how dense the colour was! Grape Pop was better with two coats, but Heli-Yum was a solid one coater! Finally! I had my matching one coaters for tape manis! I did this mani while watching a movie so I could give each coat enough time to dry before putting the sticky tape on it. Then, at the end for a little bit of extra flair I dotted on some glitter from a bottle of Milani Gold, from the Gems FX collection. 

The one thing that confused me with this kind of layering tape mani was the tips of my fingers. Because I have such short nails I never wrap the edges (I think that's what it's called, when you sort of paint the tip edges too) because there just ends up being polish all over my fingers! So when I finished off this manicure I could see each layer of colour on the tips of my nails, and as they wore, the darker colours underneath became really noticeable. Has anyone else had this problem? The only solution I could think of for next time was to remove the polish from the tips of my nails before the last coat, so the last coat would be the only one on the ends, just like a normal mani. I guess I'll just have to do another like this so I can see if that works!

Sunday, December 25, 2011

Happy Christmas Everyone!


OPI Black Onyx, piCture pOlish Festival, China Glaze Atlantis, Milani Gold

Merry Christmas and Happy Holidays everyone!

This was my Christmas Eve/Christmas Day manicure. I couldn't wait to use Festival. It's SO AWESOME!!! So many colours! I have to say... I may not need Cult Nails Clairvoyant now. Then I added a Christmas tree to make give it a bit more festive spirit. Festival was beautiful to apply, this was three coats. One of the things I really love about Festival is that it's in a clear base, so you can put it over any colour and get flakie awesomeness without changing your base colour. Festival is made by an Aussie company called piCture pOlish. The girls at piCture pOlish were just lovely. I received a cute little email along with my order invoice. It makes you feel all nice and special when you get personalised service! While I was on their website I picked up a couple of  Ozotic polishes as well. Prepare yourself for some awesome holo goodness and colour shifting glitter in the not so distant future!

Anyhoo, off to eat my weight in Christmas chocolate now! Have a happy and safe holiday!

Friday, December 23, 2011

Reindeer and Candy Canes!


Orly Au Champagne, China Glaze Love Marilyn, China Glaze Street Chic, China Glaze Ruby Pumps, BYS Black Striper, OPI Black Onyx, OPI Alpine Snow

Inspired by all the reindeer manis going around at the moment, mainly Nailasaurus's reindeer mani which is just adorable! My candy canes bled a bit under the tape which was annoying but oh well. 

Au Champagne is my first Orly nail polish. They're quite robust little bottles, aren't they! Who would've thought a few extra millilitres of polish would make the bottles look so massive! I bought Au Champagne in my quest to find a wearable white, and I think I've now found it! It's so shimmery and lovely but still nice and white.

I can't wait until Christmas!

Related Posts Plugin for WordPress, Blogger...