Showing posts with label Essence. Show all posts

Sunday, September 29, 2013

Day 30 - Inspired by a Tutorial


OPI My Vampire is Buff, Kester Black Poppy, Kester black Peony, Kester Black Fairy Floss, Kester Black Buttercream, OPI The "It" Colour, Essence Nude It, China Glaze Street Chic, OPI Mermaid's Tears

Oh, Mr Candiipants, you sure know how to make a fab tutorial. I was tossing up between a few tutorials for this manicure when this video tutorial popped up on my tumblr dashboard and well, that was that. 

This mani is deceptively easy and looks super impressive. Candice did it on a black background for the start of autumn in the northern hemisphere, but here in the southern hemisphere, spring had just begun, so I did it on a lighter background and stuck with pink flowers. 


Tuesday, September 3, 2013

Day 26 - Inspired by a Pattern


China Glaze A Grape Fit, OPI Dating A Royal, OPI My Vampire is Buff, OPI Can't Find My Czechbook, OPI What's With The Cattitude, Kester Black Poppy, Kester Black Peony, OPI Dutch Tulips, Essence Nude It China Glaze For Audrey

I have been painting up a storm over the past few days to try and get through the last days of the 31 Day Challenge. I started it on the 5th of September last year and I'm determined to finish it within a year! There may be some double posts.

Day 26 was inspired by this pattern. I love patterns. 


This one came from a design pattern book and I knew that it'd be great for nail art. It was also a great excuse to practice my freehand painting skills. 


Tuesday, March 19, 2013

Freestyle Flowers


OPI Skull & Glossbones, Essie Lapis of Luxury, OPI Dating A Royal, China Glaze Peachy Keen, China Glaze Electric Beat

After my foray into floral/abstract nails the other day with my Inspired by a Book mani I thought I'd give the style another go. Usually I like my manis to be quite geometric and structured. A grid of polka dots, evenly spaced lines; that's my kind of nail art. I had such fun blobbing on random spots of polish and squiggling lines around that I just had to do it again. They don't even really look that much like flowers, but I've discovered that that is the genius of this kind of manicure. It's very forgiving. 

This mani stayed on my nails for an epic five days! That's almost unheard of for me.

March 11  March 12  March 13  March 14  March 15

Thursday, January 10, 2013

Day 18 - Half Moons


Orly Glitz, OPI Dutch Tulips, Essence Make It Golden, Essie Matte About You

I'll admit I kind of cheated on this whole half moon thing. I know they're meant to be done with little circular stickers over your cuticles, but every time I attempt it that way they just look really bizarre on my hands (and weirdly not anything at all like everyone else's  Perhaps my stickers are too big?) and I have to change my mani straight away! So, for Half Moon day I decided to go for the skinnier moon and rock it ruffian style. It's still moon shaped so I say it still counts.

I was quite happy with this mani before I added the glitter, but some days you just can't help but add glitter and I couldn't resist! And who doesn't love mattified glitter?

Saturday, January 5, 2013

Wacky Space Rocks


Essence Jacob's Protection, OPI Pink Shatter, OPI Pirouette My Whistle

Hello all! Some of you may have noticed that I've added a new little thing just to the right of this post called Today's Nails. Call it an unofficial New Year's resolution, but I kind of want to intensely document what goes on my nails on a day to day basis. 

I like facts and spreadsheets and statistics, and I'm actually quite curious as to how often I really paint my nails, as well as what my most used brands, colours etc are. This led to me deciding to do a 365 of sorts on my nails this year. Every day I will take a photo on my phone (so no excuse not to do it!) of what's on my nails and it'll pop up in that little thing on the blog. 

I'm hoping it will also make me be less of a lazy bones and post my blog worthy manis more quickly, since you'll all be able to stalk Little Nails flickr and yell "Rosie, we know you did this mani two weeks ago! Stop being such a lazy bones!" at me when I'm slacking! 

So, onto today's mani, and yes, this is what's on my nails this very second! 

I'll be honest with you, this is perhaps one of the weirdest combinations of polish I've had on my nails in a long time. Yesterday I wore Essence's Jacob's Protection*. Then, after work I decided to add to it for today. On went a coat of Pink Shatter. Next I added a coat of Pirouette My Whistle because I couldn't be bothered to add a top coat. I was actually very surprised by the end result. They look kind of spacey and kind of rocky. Like fancy moon rocks!

*Ugh, it kind of annoys me that this is a Twilight themed polish. It was purchased on its own glittery merit, not because I'm "Team Jacob" or anything like that! 

Sunday, September 16, 2012

Day 4 - Green


Essence You Belong To Me, China Glaze Aquadelic, OPI Fly, Milani Gold

Day 4 was green, and I was originally going to try and do some kind of leaf themed elaborate mani. I had planned to add more lines (little tiny perpendicular ones between these lines, like the veins on a leaf) but when I got to this point I liked it so I stopped. I did however add some glitter from Milani Gold to the corners for a bit of fun!

Friday, March 30, 2012

Effie Trinket - Nail Polish Queen!

Effie Trinket Manicure - little nails

China Glaze Strawberry Fields, Barry M 289 Gold, Essence Make It Golden (and a tiny hint on the very edge of the tips of Ulta3 Gold Rush Fever)

Like every other person on the planet I've seen the Hunger Games at the movies in the past week and read the books. And like every other nail polish addict on the planet, I've done a HG manicure! Hooray! 

Because I am not all that skilled with painting intricate designs like Mockingjay birds, or tiny bows and arrows, I did something different. When I saw the movies I loved Effie's nails. I love Elizabeth Banks (they need to bust Avery out of North Korea on 30 Rock so she can be a regular again on the show!) and honestly, Effie was my favourite part of the movie! These nails are inspired by the awesome gradient mani she rocked in the reaping scene:


(hardest thing to find a photo of on the interwebs. They were much more impressive in the movie but you get the idea)

Anyway. They were awesome so obviously I had to have them too! 

Saturday, January 28, 2012

Spotty Dots


OPI Dating A Royal, OPI Skull & Glossbones, OPI Mermaid's Tears, Essence Forget Me Not, China Glaze Heli-Yum

I've been in a bit of a dotty mood lately, and thought I'd try out some multi coloured dots. I was a bit too dot keen on my left hand (I'm a leftie, so I blame my right hand for not spacing the dots correctly), and they're closer together and a little less great than on my right hand but oh well, they still looked all right.

I had to go into the city today and it was a great trip for nail polish! I randomly found a stand of Barry M's in a chemist (I didn't even know they were available in Australia!) and they were half price! ($5.50 down from $11). I grabbed three, Gold 289, Navy 296 and Vivid Purple 161. It was actually a bit bizarre seeing such boring nail polish names.

Continuing on with my Good Luck Nail Polish Day, in David Jones the OPI Holland collection was on display! They got it in this morning! I was just so excited because I'd been at the Bondi Junction DJs yesterday and the lady there said she thought they were getting it in in a couple of weeks! I'd only been lusting after one colour, I Have A Herring Problem, so I caved and picked that up! 

Friday, January 20, 2012

Lady Nicki & Crazy Nicki


Lady Nicki
OPI Skull and Glossbones, OPI Fly, Bundle Monster BM-225


Crazy Nicki
OPI Fly, OPI Ate Berries In The Canaries, Essence Make It Golden

I am a massive green / turquoise / blue kind of girl so Fly from OPI's Nicki Minaj was just calling my name. I kind of thought it might be the same as China Glaze Custom Kicks, one of my favourites, just without the gold bits, but it's different enough that it's clear now that I definitely needed it. At the same time I also got Skull & Glossbones. Now, I was all kinds of obsessed over the Pirates of the Caribbean collection when it came out, but thought that Skull & Glossbones was too boring, so I didn't get it. Big mistake Rosie! Then, over the past few weeks I've been seeing it everywhere on the internet, looking all lovely and neutral, so of course I had to have it! 

Today I present to you: Nicki Minaj, two ways. The first mani is my classy lady Nicki Minaj mani. It kind of looks like wallpaper and I love that! And of course to balance out the classy demure Nicki I had to do a crazy Nicki mani. Bright colours? Check. Out there accent nail? Check. Glitter explosion? Check. 

In other news, today just happens to be my birthday and my awesome housemate Lucy surprised me with a very special nail polish, which I am sure will be featured heavily in Monday's post. I'll give you some hints... it's one of the most talked about polishes of 2011 (in my humble opinion), it changes colour, it is amazing and it comes in a square bottle. I have it on my nails as I type this, and I just can't tear my eyes away from my fingers! Have you guessed it yet????


Wednesday, December 28, 2011

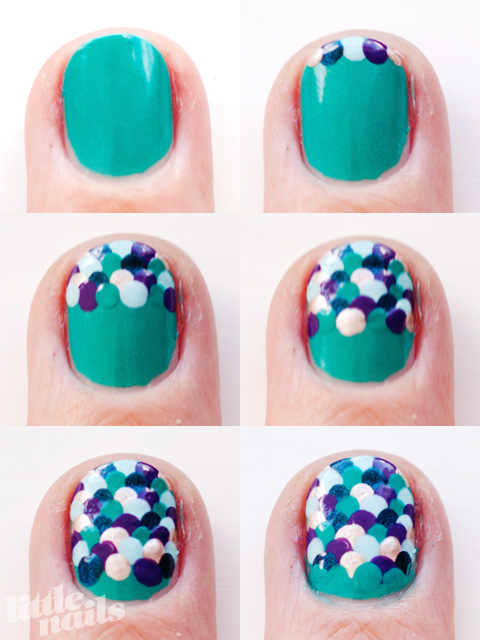
Mermaid Nail Tutorial


China Glaze Custom Kicks, China Glaze Grape Pop, China Glaze Rodeo Diva, Essence You Belong To Me, Face Of Australia White Gold

A few people have been asking how I did the scaley nail on my Sparkly Mermaid Nails mani, so here's a tutorial for it. It's really very simple, all you need to be able to do is to make dots. 

First I start with a base coat, usually using one of the colours I'll be using for the dots. Then, starting from the tip of my nail I make a row of dots using different colours. Sometimes I put a blob of each nail polish on my desk and dip my dotter in there, other times if I don't want to waste any polish I'll just poke the brush of the polish with my dotter. After each dot I wipe the dotter on a cotton ball soaked with nail polish remover so the colours don't get all mixed up. 

The reason I use so many different colours is that it looks better if there aren't any dots of the same colour next to each other, and having lots of colours makes it easy to keep them all separated. 

After the first row, I just keep dotting different coloured dots down the nail, overlapping them like the scales of a fish. 

At the end I use the same colour as the base coat to sort of form a start off point for the scales. In my original mani I started from the bottom, instead of the top, so it was backwards to this, but you can do it either way. And finally, finish it all off with a nice top coat!

This one is a little bit messier looking because I used smaller dots but it's the same process. So, if you can use a dotting tool and have a bit of time then you can do this mani! I hope this made sense. If you're unclear about anything just comment and I'll try to explain it in a better way.

***** a little extra *****

Since I popped this online I've seen a couple of other nail bloggers' designs using this tutorial and they just look so amazing that I wanted to share them here, so you can all see how awesome they look and the great colour schemes and whatnot so check out getnail-d and Delaynee's versions! Now I want to do this mani in a million different colour schemes! Thanks ladies!


Thursday, December 22, 2011

Nailside Christmas Tree Mani


China Glaze Rodeo Fanatic China Glaze Heli-Yum, Milani Gold, Essence Make It Golden

Nailside is so good at coming up with super easy tape nail art. This Christmas tree came from her Abstract Christmas Tree Tutorial. It's so easy and so cute! I wanted to keep doing Christmas themed nails, but I just received a bunch of new polishes in the post and I wanted to try them out. So this ended up being less Christmasy coloured than my other Christmas manis. My nails are a mess at the moment. My job kind of kills them every day and it's been so busy with the Christmas rush that they're getting a real bang around each day!

Friday, December 16, 2011

Glitter In The Sandwich


Essence Forget Me Not, Essie Lapis of Luxury, Essence Make It Golden, Milani Silver

This is a bizarre sort of mani. Lots of different layers happening here. I'd spent the whole day before I did this mani lusting over Deborah Lippmann's Glitter In The Air. When I got home I felt like doing a bit of a glitter sandwich and Essie Lapis Of Luxury is usually annoyingly sheer to me so I thought it'd do well as a top colour! The layers here are 1 coat of Forget Me Not, 2 coats of Lapis of Luxury, 1 of Make It Golden, 1 of Silver and another 1 of Lapis of Luxury.

I took this photo the next evening, after a very busy day at work. I think it held up quite well, considering my job is very hands on and they get banged about quite a bit! 

Tuesday, December 13, 2011

Essence Swatches

Oh, Essence. I need to stop gushing about you. There was a surprise in Target when I popped in the other day. The little shelf below the row of Colour & Go polishes in the Essence display that I usually use as a sorting/storage area while shopping had been filled with the Vampire's Love collection. It's quite strange being in Australia when we're in the middle of summer to see colours for autumn and winter. My nails always seem to be confused seasonally. In summer I want to wear dark wintery colours because that's what's being released and plastered across the internet, and in winter I want to wear crazy bright colours! We just can't win down here! 


Essence Into The Dark

Into The Dark only needed one coat! That's right, that up there is just one coat. I think out of my bajillion nail polishes I only have about three that only need one coat. Good job Essence!


Essence True Love

True Love is a lovely sort of shimmery polish. I don't have any purple polishes similar to this shade so it was a must have. This was two coats. 


Essence Choose Me

Choose Me (from the regular Colour & Go collection) is apparently a dupe for OPI Catch Me In Your Net, Zoya Charla and Orly Halley's Comet. I don't own any of these (and now apparently don't need to!) so I can't compare them. Choose Me is really beautiful in real life, although while it looks completely opaque in two coats in the shade, in the sun it seemed to become a bit sheer. This was three coats.

Thursday, December 8, 2011

Forget Me Not & Party Fever


Essence Forget Me Not, Kleancolor Party Fever

Essence is my new favourite brand. I'm really amazed at the quality of these polishes considering their price (compared to the standard $18-20 for other brands). Forget Me Not is a cornflower blue, almost purple polish with a very subtle shimmer. It's applied like a dream and was just a delight! This one came from the Blossoms etc collection and was only $3.50 (I think? Around that price). The one thing I didn't like about it was the shape of the bottle. It's tall and thin, like a nail art bottle and I kept on feeling like I might accidentally tip it over. 

For a bit of fun I did a coat of Kleancolor Party Fever on top. I got a bunch of Kleancolors a few months ago, all of them glitters, and all of them awesome!

Tuesday, December 6, 2011

Blue Addicted


Essence Blue Addicted

Whoa! I was so excited to find Essence in my local Target the other day and the thing that had me the most excited was that they had this polish! Blue Addicted is from the Colour & Go range and is a pretty spot on dupe of Deborah Lippmann's Across the Universe (or so I have been told. I don't have AtU to compare it with sadly). It's just a crazily beautiful polish. It looks like a seaweedy under-sea sparkle-fest on your nails. And for only $2.55 a bottle how can you say no? I even went back to get a second bottle since it is only 5mls.


Look at that glitter! 

As you can also probably tell, I cut my nails. This blog isn't called Little Nails for nothing! Trying out the whole squared shape thing, usually I like them super rounded, but I thought I'd try something different!

Monday, November 28, 2011

Houston, we have too much glitter!


OPI Houston We Have A Purple, Essence Make It Golden, Milani Gold

You can buy Essence in Australia!!! At Target!!! And I'd never even known! I'd been eyeing off a few Essence polishes for a while after seeing them on the interwebs (mainly on Nailside) but I was pretty sure the brand was only available in Europe. So imagine my surprise when there they were in my little country town's Target! They only had the Colour & Go range (not the Nail Art Twins that I so desperately wanted). I managed to limit myself to three - Make It Golden, Blue Addiction and You Belong To Me,  but for only $2.55 a bottle (only 5ml, but oh well) I may have to go grab a few other colours! 

My original plan with this mani was to use Houston We Have A Purple as the base and then just put one coat of Make It Golden over the top. But... the glitter mad part of my brain decided that it just wasn't enough glitter, so I added a coat of Gold and instantly I knew I'd gone too far. Never thought I'd say it, but there was too much glitter! This mani didn't last long because of the over-glittering, also I banged my hand and put a massive dent/hole in one finger just after taking this photo so I would have had to do some serious damage control if I was to keep it on. Just easier to do another mani. And a good excuse to paint my nails twice in one day!

Related Posts Plugin for WordPress, Blogger...