China Glaze Custom Kicks, China Glaze Grape Pop, China Glaze Rodeo Diva, Essence You Belong To Me, Face Of Australia White Gold
A few people have been asking how I did the scaley nail on my
Sparkly Mermaid Nails mani, so here's a tutorial for it. It's really very simple, all you need to be able to do is to make dots.
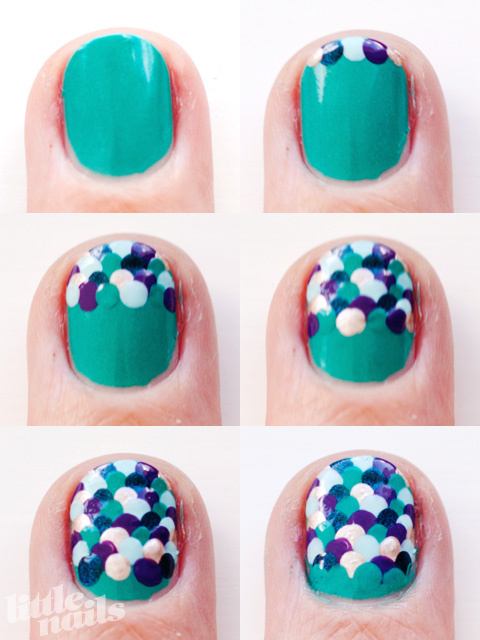
First I start with a base coat, usually using one of the colours I'll be using for the dots. Then, starting from the tip of my nail I make a row of dots using different colours. Sometimes I put a blob of each nail polish on my desk and dip my dotter in there, other times if I don't want to waste any polish I'll just poke the brush of the polish with my dotter. After each dot I wipe the dotter on a cotton ball soaked with nail polish remover so the colours don't get all mixed up.
The reason I use so many different colours is that it looks better if there aren't any dots of the same colour next to each other, and having lots of colours makes it easy to keep them all separated.
After the first row, I just keep dotting different coloured dots down the nail, overlapping them like the scales of a fish.
At the end I use the same colour as the base coat to sort of form a start off point for the scales. In my original mani I started from the bottom, instead of the top, so it was backwards to this, but you can do it either way. And finally, finish it all off with a nice top coat!
This one is a little bit messier looking because I used smaller dots but it's the same process. So, if you can use a dotting tool and have a bit of time then you can do this mani! I hope this made sense. If you're unclear about anything just comment and I'll try to explain it in a better way.
***** a little extra *****
Since I popped this online I've seen a couple of other nail bloggers' designs using this tutorial and they just look so amazing that I wanted to share them here, so you can all see how awesome they look and the great colour schemes and whatnot so check out
getnail-d and
Delaynee's versions! Now I want to do this mani in a million different colour schemes! Thanks ladies!