piCture pOlish Ocean, piCture pOlish White Wedding, piCture pOlish Dorothy
Welcome to the most epic post in the history of Little Nails! This is my 2013 piCutre pOlish Blog Fest post. piCture pOlish is an Australian brand with the greatest tradition. Every year they have The piCture pOlish Blog Fest and invite bloggers to review their nail polishes.
This year's Blog Fest theme is Celebrating the Year of the Blogger and has an emphasis on nail art.

As soon as I heard which shades I was getting and the whole nail art side of it I knew exactly what I was going to do. It's not new news that I'm obsessed with making nail art sticker/decal stripe things, usually with a chevron pattern and over the past few months I've found that piCture pOlish shades (and Ozotic shades, also sold by PP) are fantastic for this kind of nail art. They seem to be more flexible than other brands and the strips never crack when you handle them.
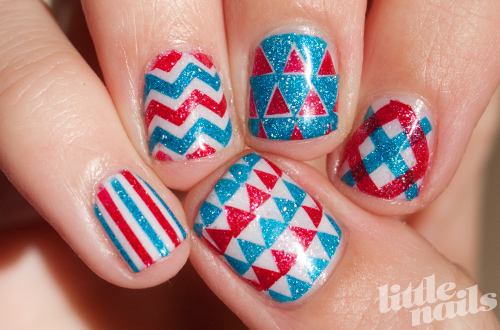
This time I thought I'd branch out from the chevron pattern. I played around with stripes and triangles and ended up with a red, white and blue mixed manicure.
And just in case you want to try this kind of mani out yourself, I've whipped up tutorials for the decals which are at the end of this post (warning, I may have gone slightly overboard! The general concept of each tutorial is the same but it's always fun to try different patterns)

Dorothy is a red glitter polish. It's actually tiny silver glitter in a red jelly base and doesn't need many coats to get the great red colour.

Ocean has piCture pOlish's amazing little shards of rainbow goodness, what I've previously described as "particles of magic". They're suspended in a blue jelly base. I wouldn't call this kind of polish a glitter, but it has a lovely sparkle and glimmer to it.

White Wedding also has "particles of magic" in it. It's absolutely impossible to capture on camera the rainbow hidden inside this colour. It's definitely a wearable white and was great to apply. Three coats was more than enough.

All shades can be purchased online at www.picturepolish.com.au and if you don't live in Australia don't fret, you can purchase piCture pOlish all over the world through their network partners. They also have everyday deals to take advantage of.
You can find piCture pOlish all over the internet including Facebook, Pinterest, Instagram, Twitter and YouTube.
Once you get the hang of sticking down the polish pieces it's really easy to make cool geometric patterns and the possibilities are endless. This is all the same method, just with different shapes. I use tweezers and a dotting tool (or a pen or pencil if you lose your dotting tool like I did) to apply the polish pieces. Sometimes I'll dampen the dotting tool with clear polish or even remover to make it easier for the polish pieces to stick to the dotter.


These polishes were provided to me for review
Check out all the other amazing Blog Fest participants: